Publishing Service Applications between SharePoint 2010 Farms ? Part 2

Foreword : Huge thanks to Todd Klindt for sending me a sneak preview chapter of his and Shane Young’s new book.  Their chapter on Service Applications helped me to work through and figure out why this process was not initially working for me as it is extremely finicky and will fail if the ordering of these items is incorrect.

In Part 1 I discussed how to create a trust between farms, establish permissions, publish a service application and finally consume it from a remote farm all through

PowerShell, well mostly through PowerShell. So there are a few downsides with that, sure its easy and repeatable but to a lot of people it is not terribly friendly.  There is also the fact that while it works, in situations where there are issues PowerShell will smile and let you continue blindly down the path while you might not realise that the end process is going to fail.

So with all of that in mind, how do we publish Service Applications between SharePoint 2010 farms in Central Administration”  Well not all of it can be done easily through Central Administration.

The first few steps “exporting the certificates” still need to be done in PowerShell.

1. Export and copy all certificates between Farms

First off, lets do steps 1-5 from Part 1 (https://mrhodes.net/2010/05/19/publishing-service-applications-between-sharepoint-2010-farms-part-1-8/)

This should get us to the point where all certificates have been exported and are ready to be imported on their respective servers.

2. Import root certificate from PROVIDER to CONSUMER

On the CONSUMER farm:

Open up Central Administration, and browse to “Security” then click on “Manage Trust”

Click “New” on the ribbon.

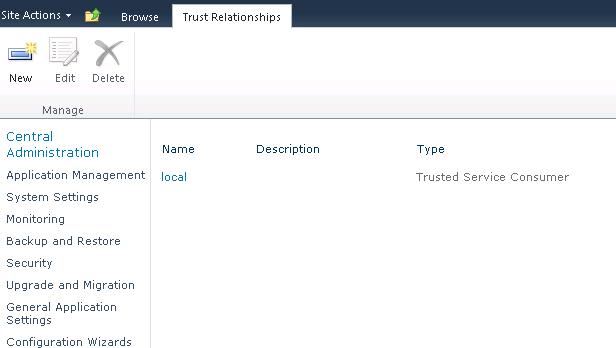
A new screen should pop up labelled “Establish Trust Relationship”.  Put in the name.  I generally use “PROVIDER [FARM NAME]” to denote a certificate imported from a PROVIDER farm, and vice versa for CONSUMER.

Next click “Browse” and select the “Provider-root.cer” file that was exported to c:certificates

Do not tick the box for “Provide Trust Relationship” or upload another cert as this is all you need on the consumer farm.

Click “OK” and you should now have a new Consumer trust established.

2. Import Root and STS certificates from CONSUMER to PROVIDER

On the PROVIDER farm:

As per the previous steps open up Central Administration, and browse to “Security” then click on “Manage Trust”, then click “New” on the ribbon.

The “Establish Trust Relationship” screen should appear.  Put in the name, this time lead with “CONSUMER [FARM NAME]”

Next click “Browse” and select the “Consumer-root.cer” file that was exported to c:certificates.

Under “Token Issuer Description” put in a description such as “CONSUMER [FARMNAME] STS”

Tick the box for “Provide Trust Relationship” and click “Browse” to upload the “Consumer-STS.cer” from c:certificates

Click “OK”

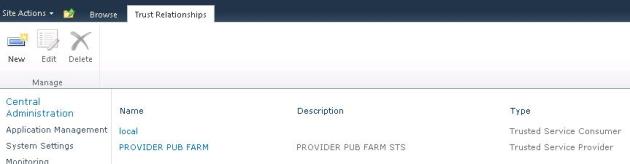
You should now have a new trust appearing on your provider.

Note : On a farm providing services, the trust will be labelled as “Trusted Service Provider” and on a farm consuming services, the trust will be labelled as “Trusted Service Consumer”.  Please note that this denotes the trust itself, not the certificates or the farm, hence why the naming may seem confusing.

3.  Establish Consumer Farm permissions on Provider Farm

At this point we really need to return to PowerShell to do steps 10 and 11 from the previous blog post.  It is a bit annoying, but unfortunately I don’t know of any way to establish the permissions, or even retrieve the farm ID from Central Administration.

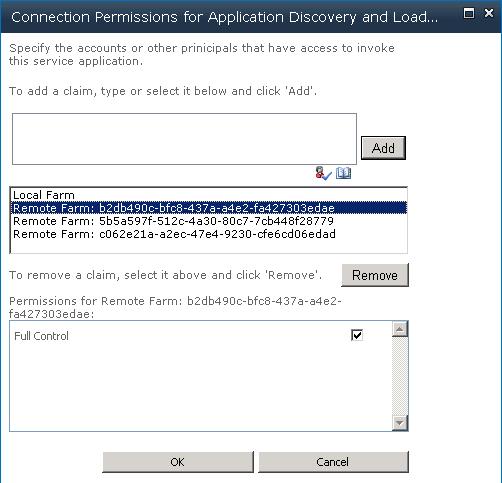
4. Check that the permissions have been established.

On the provider farm you can check to ensure the permissions have been granted successfully by loading up Central Administration and going to “Manage Service Applications”.

Click on “Application Discovery and Load Balancer Service Application” and click “Permissions” from the ribbon.

Your farm GUID should be listed in here with full permissions.

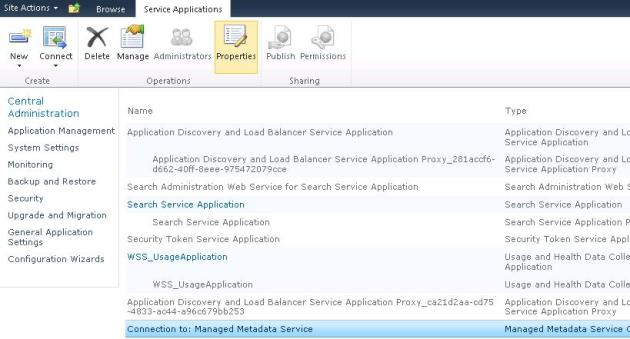
5. Publish a Service Application

On your Provider Farm :

Browse to Service Applications, select the application you wish to publish and click “Publish” on the ribbon.

Then select the connection type, check the checkbox “Publish this service application to other farms” and be sure to copy out your Published URL to your clipboard.

6. Connect to a Service Application

On your CONSUMER farm:

Open Central Administration and browse to “Manage Service Applications”

Click on “Connect” from the ribbon and select the appropriate Service Application Proxy Type.

Paste in the URL you copied in the last step from the Provider’s Farm and Click “OK”

After a few seconds it should come back with the below screen.  Select the application and click “OK”

Choose an appropriate name and click “OK”

Congratulations, your service application is connected.  Click “OK”

7. Connected Service Application Properties

Now select your new service application and click “Properties” from the ribbon.

You should see a screen that depending on the service application will allow you some degree of customization.   For example,this is for a Managed Metadata Service Connection :

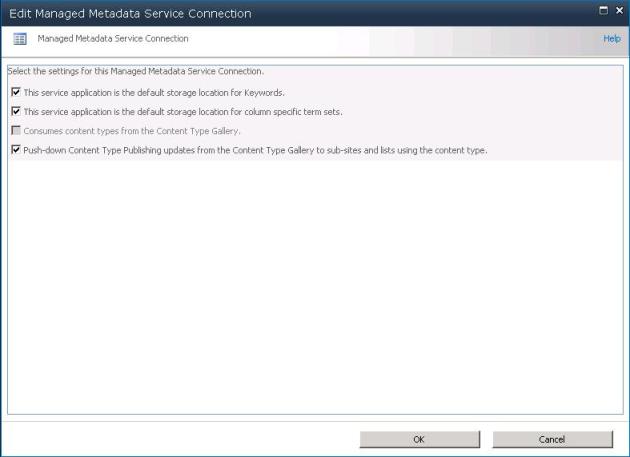
If you can see this screen and edit the properties then you can be fairly confident the connection has worked successfully!

I personally find that the easiest way to do this on a repeatable basis is via PowerShell, however in almost all situations I will use Step 7 from this post to connect as it is just easier, and if for some reason it fails then it will actually tell you.

While none of these steps is especially difficult, putting them together in a cohesive order that works every time took a bit of juggling.  I hope these posts have been helpful.

Advertisement

Publishing Service Applications between SharePoint 2010 Farms – Part 1

Foreword : This post has been updated as while it did appear to be working successfully was actually not.  Huge thanks to Todd Klindt for sending me a sneak preview chapter of his and Shane Young?s new book.  Their chapter on Service Applications helped me to work through and figure out why this process was not working for me as it is extremely finicky and will fail if the ordering of these items is incorrect.

I have spent some time recently trying to publish service applications between two different SharePoint 2010 farms.  There is a fairly detailed guide on how to accomplish this over on technet at http://technet.microsoft.com/en-us/library/ff621100.aspx however it seems the articles are incorrect or at least they did not work as expected for me.

I noticed a few problems immediately, one of them being that at least one command is no longer available in the RTM version of SharePoint 2010, this aside it was fairly easy to figure out the replacement commands.  However not just the commands are an issue here, it seems as though the entire process is incomplete.

After spending a lot of time tweaking and investigating how the actual process is meant to work, I found that the problem lay in trust between the farms, In order to consume a service from a remote farm, both farms must have their root certificates installed on each other, and the Consumer farm must have its Secure Token Service certificate installed onto the Providers farm.

Here is my guide on how to publish service applications between farms via PowerShell :

Note : In order to keep things simple, the PROVIDER farm is the Green Powershell Window.  The CONSUMER  farm is the Blue PowerShell Window.

1. On a server in both farms make a directory called certificates on C: – this is just to keep the certificates in one place.

2. Export root certificate from CONSUMER

$rootCert = (Get-SPCertificateAuthority).RootCertificate
$rootCert.Export(“Cert”) | Set-Content c:\certificates\consumer-root.cer -encoding byte

(See Screenshot below)

3. Export STS Certificate from CONSUMER

$stsCert = (Get-SPSecurityTokenServiceConfig).LocalLoginProvider.SigningCertificate
$stsCert.Export(“Cert”) | Set-Content c:\certificates\consumer-sts.cer -encoding byte

** Note : You might notice that I am checking out to make sure the $rootCert and $stsCert variables contain the certificate.  I’ve had it not work a few times, so just like to double check prior to exporting a null variable, which will working quite successfully until you try to find the .cer file.

4. Export root certificate from PROVIDER

$rootCert = (Get-SPCertificateAuthority).RootCertificate
$rootCert.Export(“Cert”) | Set-Content c:\certificates\provider-root.cer -encoding byte


5. Copy certificates between farms

Copy the contents of the c:certificates directory to the other farms.  I don’t think I need to tell you how to do this 🙂

6. Import root certificate from PROVIDER to CONSUMER

$trustedRootCert = Get-PFXCertificate c:\certificates\provider-root.cer
New-SPTrustedRootAuthority “PROVIDER <FARM NAME>” -Certificate $trustedRootCert

7. Import root certificate from CONSUMER to PROVIDER

$trustedRootCert = Get-PFXCertificate c:\certificates\consumer-root.cer
New-SPTrustedRootAuthority “CONSUMER <FARM NAME>” -Certificate $trustedRootCert

8. Import STS certificate from CONSUMER to PROVIDER

$stsCert = Get-PFXCertificate c:\certificates\consumer-sts.cer
New-SPTrustedServiceTokenIssuer “CONSUMER <FARM NAME>” -Certificate $stsCert

9. Publish Service Application

The easiest way to do this is through Central Administration, as it will allow you to select HTTP or HTTPS, as well as and paste the appropriate URI to connect to the topology application.  This URI is a really really long one, make sure you copy the whole thing!

Browse to Service Applications, select the application you wish to publish and click “Publish” on the ribbon.

Then select the connection type, check the checkbox “Publish this service application to other farms” and copy out your Published URL.

10.  Retrieve Farm ID from Consumer Farm

(Get-SPFarm).ID

This will retrieve the GUID of the Consuming Farm.  Keep this for the next step.

11.  Grant Consumer Farm permissions

Note : This step was sourced from http://harbar.net/archive/2010/05/03/service-application-federation-with-sharepoint-2010.aspx – Huge thanks to Spencer as it helped me to get through the exact error listed on his post.

$security = Get-SPTopologyServiceApplication | Get-SPServiceApplicationSecurity
$claimProvider = (Get-SPClaimProvider System).ClaimProvider
$principal = New-SPClaimsPrincipal -ClaimType
http://schemas.microsoft.com/sharepoint/2009/08/claims/farmid -ClaimProvider $claimProvider -ClaimValue <farmid>
Grant-SPObjectSecurity -Identity $security -Principal $principal -Rights “Full Control”
Get-SPTopologyServiceApplication | Set-SPServiceApplicationSecurity -ObjectSecurity $security

12.  Check Load Balancer Permissions

You can check to ensure the permissions have been granted successfully by loading up Central Administration on your provider farm, going to ?Manage Service Applications?.

Click on ?Application Discovery and Load Balancer Service Application? and click ?Permissions? from the ribbon.

Your farm GUID should be listed in here with full permissions.

13. Connect to Service Application

Note : I would highly recommend performing this step via Central Administration unless you have done this more than once.  Doing this step via PowerShell can result in no error messages, however the connection may not be established correctly.  Using Central Administration ensures that a error message will be given on failure.  Please see Step 7 of Part 2 of this series for information on how to do this.

New-SPMetadataServiceApplicationProxy -Name “<FARM NAME> Managed Metadata” -Uri “<Insert Service Topology Uri from step 8.>”

Note : This last step will vary based on the service application you wish to publish.  The command should stay in the format “New-SP<ServiceName>ApplicationProxy” and the parameters may vary (some use URL, some use URI)

There we have it!  We have succesfully published a Service Application from one farm to another

In Part 2 I will show you how to do this via Central Administration for the folks who prefer a GUI.

SharePoint Designer 2010 – The server could not complete your request. The content type of the response is "".

Last night I came across an interesting problem, a SharePoint Server 2010 site that I am hosting on a Beta 2 server was having issues connecting via SharePoint Designer 2010.  A colleague brought my attention to it, and the very unhelp error messages that were being displayed, with no events in the event log on his PC.

He reported that the initial connection from SharePoint Designer 2010 appeared to be okay, however soon after being established the following error would occur:

Error 1

Error 2

This was very odd as the previous server this site had resided on had had no problems at all.  My first thought was that this must be an authentication issue, and I immediately tried switching from Claims Based Authentication back to Classic Authentication.  This had no effect on the problem.

I then cranked up the logging on the server, cleared the event logs and tried to make a connection again and the following came up almost immediately : 

 WebHost failed to process a request.
 Sender Information: System.ServiceModel.ServiceHostingEnvironment+HostingManager/59487907
 Exception: System.ServiceModel.ServiceActivationException: The service '/_vti_bin/client.svc' cannot be activated due to an exception during compilation.  The exception message is: This collection already contains an address with scheme http.  There can be at most one address per scheme in this collection.
Parameter name: item. —> System.ArgumentException: This collection already contains an address with scheme http.  There can be at most one address per scheme in this collection.
Parameter name: item
   at System.ServiceModel.UriSchemeKeyedCollection.InsertItem(Int32 index, Uri item)
   at System.Collections.Generic.SynchronizedCollection`1.Add(T item)
   at System.ServiceModel.UriSchemeKeyedCollection..ctor(Uri[] addresses)
   at System.ServiceModel.ServiceHost..ctor(Type serviceType, Uri[] baseAddresses)
   at System.ServiceModel.Activation.ServiceHostFactory.CreateServiceHost(Type serviceType, Uri[] baseAddresses)
   at System.ServiceModel.Activation.ServiceHostFactory.CreateServiceHost(String constructorString, Uri[] baseAddresses)
   at System.ServiceModel.ServiceHostingEnvironment.HostingManager.CreateService(String normalizedVirtualPath)
   at System.ServiceModel.ServiceHostingEnvironment.HostingManager.ActivateService(String normalizedVirtualPath)
   at System.ServiceModel.ServiceHostingEnvironment.HostingManager.EnsureServiceAvailable(String normalizedVirtualPath)
   — End of inner exception stack trace —
   at System.ServiceModel.ServiceHostingEnvironment.HostingManager.EnsureServiceAvailable(String normalizedVirtualPath)
   at System.ServiceModel.ServiceHostingEnvironment.EnsureServiceAvailableFast(String relativeVirtualPath)
 Process Name: w3wp
 Process ID: 6116
 

Fortunately this error is a fairly well known and documented WCF problem, and a quick search came up with this : http://social.msdn.microsoft.com/Forums/en-US/wcf/thread/9e248455-1c4d-4c5c-851c-79d9c1631e21/#page:1 

The short version?  WCF only supports one binding per IIS Web Site.  This can obviously be a problem where multiple host header bindings are required on the same IIS web site.  

The easy way around this?  Add another IP to your webserver, and setup a wildcard IP binding on that IIS site.  Then update your name server to point to the new IP address.  Host Header requests will still work fine as SharePoint will use its own internal Host Header Filter to discern which site to send each request to.   There are other work arounds so that you can have multiple bindings, but you will probably have to hack a bit to get them working.  Go seaching at your own peril 🙂

While this particular issue only presented itself on SharePoint Designer at first, upon closer inspection I found that other services, such as my Search Service Application, Tag Cloud, Multiple File Upload, etc were not working at all.  I would imagine best practices would be to always only use a single binding on each IIS website on your SharePoint 2010 servers.

To quote the colleague who brought it to my attention "It is a major thing and I pity the fool that thinks he can have http://intranet and http://intranet.company.com on the same web app ;o)".  Well said.

Moving a SharePoint 2010 Site Collection to another Content Database

Moving a Content Database to another Site Collection has never been easier than in PowerShell.  Just fire up your PowerShell, add the Snap-In for SharePoint and run Move-SPSite.

PS C:Usersmrhodes> get-help Move-SPSite -full

NAME
    Move-SPSite

SYNTAX
    Move-SPSite [-Identity] <SPSitePipeBind> -DestinationDatabase <SPContentDatabasePipeBind> [-AssignmentCollection <S
    PAssignmentCollection>] [-Verbose] [-Debug] [-ErrorAction <ActionPreference>] [-WarningAction <ActionPreference>] [
    -ErrorVariable <String>] [-WarningVariable <String>] [-OutVariable <String>] [-OutBuffer <Int32>] [-WhatIf] [-Confi
    rm]

PS C:Usersmrhodes> Move-SPSite -Identity http://mysharepointsite.com.au/sites/user -destinationdatabase WSS-Content-NewUserDB

Confirm
Are you sure you want to perform this action?
Performing operation "Move-SPSite" on Target "http://mysharepointsite.com.au/sites/user".
[Y] Yes  [A] Yes to All  [N] No  [L] No to All  [S] Suspend  [?] Help (default is "Y"): y
WARNING: IIS must be restarted before this change will take effect. To restart IIS, open a command prompt window and
type iisreset.
 

And just that easily, my Site Collection has now been moved to a new Content Database!

Removing a Managed Account from SharePoint 2010

Hello to my two regular readers and people who accidentally clicked this link from twitter! My apologies that it has been so long since my last post.

This morning I found a peculiar little quirk of SharePoint 2010 today when trying to make changes to the Managed Accounts on one of my farms.

This error was coming up whenever I tried to access the "Managed Accounts" section of security under Central Administration.  Obviously this caused a problem as I could not add / remove any service accounts, and one of them was corrupted.  How did I manage to corrupt a service account?  Thats a story for another time.

So I figured the easiest way to get rid of this would be to familiarize myself with the SharePoint PowerShell Cmdlets.

First off I loaded the appropriate PowerShell snapin via "Add-PSSnapin Microsoft.SharePoint.Powershell"

By using the "Get-Command -Noun "SP*" I was able to get a full list of SharePoint commands, and pretty much right where I expected it was "Get-SPManagedAccount"

By using this command I was able to output a list of my Managed Accounts :

Simple PowerShell logic dictated that the appropriate commands were most likely "New-SPManagedAccount", "Set-SPManagedAccount" and "Remove-SPManagedAccount".  

PowerShell

Fairly quickly I was able to remove the offending ManagedAccount and restore functionality to the "Managed Accounts" section of Central Administration.

Managed Accounts

For those not familiar with PowerShell this is all very simple and easy to accomplish.  If you are ever in doubt on how to use a PowerShell command just type in "Get-Help CommandName -full" and you will have a whole heap of information to help you out.

The user does not exist or is not unique

Many times in the last couple of years I have come across the message "The user does not exist or is not unique."  It is usually on its own, with no other error messages or clues to deciphering its cryptic text.  Generally I have had only limited success in getting past this error, usually getting around it via chance or a rebuild / restore. 

Today when trying to move a Site Collection from a Dev to a Production server we came across this message, it was occuring on just about every stsadm command I ran.  To make matters worse in Central Administration I could not even select the Site Collection.  Obviously at this point a rebuild / restore (my usual methods for dealing with this kind of thing) would not be very helpful being a brand new server, and I was trying to restore a backup anyway.

Even using stsadm I could not set myself as the Site Collection Owner. 

C:Program FilesCommon FilesMicrosoft SharedWeb Server Extensions12BIN>stsadm -o siteowner  -url http://www.site.com -ownerlogin domainadmin

The user does not exist or is not unique.

It turns out that the cause of this was not something unique to production server like I would expect, it was something from the development server that I definitely did not expect.  In this case the Site Collection had been restricted to a specific Active Directory Organizational Unit.  I would not have expected this to be done on a production server, let alone on a development server, and did not go looking for it. 

Even if I had gone looking for it, where would I find it?  It can be found with the following command :

stsadm -o getsiteuseraccountdirectorypath

The "GetSiteUserAccountDirectoryPath" command allows you to lock down a Site Collection to only add new members that are inside the Organization Unit specified when running the command. 

What was fairly unique about this scenario was that in this case, as almost every time I ran any command that referenced the Site Collection I would receive "the user does not exist or is not unique".

To check to see if this property was even set, I ran the command as the Application Pool account for the Web Application. 

C:Program FilesCommon FilesMicrosoft SharedWeb Server Extensions12BIN>runas /noprofile /user:DOMAINapp-pool-acct cmd
Enter the password for DOMAINapp-pool-acct:
Attempting to start cmd as user "DOMAINapp-pool-acct" …

Using this user I was able to successfully confirm that the Site Collection was definitely locked down to a specific OU, which did not even exist in this environment :

C:Program FilesCommon FilesMicrosoft SharedWeb Server Extensions12BIN>stsadm -o getsiteuseraccountdirectorypath -url http://www.site.com

<SiteUserAccountDirectoryPath>ou=team,ou=department,ou=company,DC=domain,DC=com</SiteUserAccountDirectoryPath>

I was then able to unlock the Site Collection from the OU by issuing the following command :

C:Program FilesCommon FilesMicrosoft SharedWeb Server Extensions12BIN>stsadm -o setsiteuseraccountdirectorypath -url http://www.site.com -path ""

Operation completed successfully.

A quick retry of the previous operation was successful and I could once again make myself a Site Collection Administrator. 

C:Program FilesCommon FilesMicrosoft SharedWeb Server Extensions12BIN>stsadm -o siteowner  -url http://www.site.com -ownerlogin DOMAINadmin

Operation completed successfully.

At this point the Operation completed successfully message was a very welcome message. 

While I do not expect that this will be the cause for every instance of this error message, it is a helpful marker that tends to indicate when this error is occuring the Site Collection is unable to find a user object in Active Directory.  If this error occurs I strong recommend looking at anything that may help or hinder access to Active Directory. 

It is also possible this issue could have been resolved by the peoplepicker-serviceaccountdirectorypaths property, however I did not have a chance to try this out.  For more information on that one : http://technet.microsoft.com/en-us/library/cc263012.aspx

Content Deployment Error – There is no web named "".

Content deployment seems to be one of those topics that a lot of people tend to avoid, this is most likely because it has a whole host of nuances and subtleties that can make it seem buggy or unusable.

In the spirit of documenting the little quirks of content deployment, here is one I encountered just this week. 

The Execute method of job definition Microsoft.SharePoint.Publishing.Administration.ContentDeploymentJobDefinition (ID d3d7ac13-f785-4f03-8a73-88505cf6ec7b) threw an exception. More information is included below.

There is no Web named "".

I coaxed this error out from a failing content deployment job after chasing wild geese in the form of two error messages :

Publishing: Content deployment job failed. Error: 'System.ArgumentOutOfRangeException: The specified indexer value for this collection could not be found or is not unique.
Parameter name: jobId

and

The Execute method of job definition Microsoft.SharePoint.Publishing.Administration.ContentDeploymentJobDefinition (ID ac28b255-0933-4ba0-9458-20bf97f6fcf9) threw an exception. More information is included below.

The specified indexer value for this collection could not be found or is not unique.
Parameter name: jobId

Getting past those two errors was simply restarting the WSS Search and Office Search services via Services, and then starting them up again via Stsadm.  Immediately after this upon the next content deployment push I saw the initial error message with "There is no web named """.

The cause of the message was the transaction log on the database running out of space.  I have seem this happen before if the content deployment push is a large one, in one case we saw the transaction log blow out to over 50 gigabytes in less than an hour.

In this particular case it was because the transaction log was set to autogrow with a maximum size of 6 gigabytes.  As soon as the transaction log was truncated via a SQL backup there was space available and the content deployment could continue!

For sites using Content Deployment regularly I would recommend plenty of disk space, an unlimited transaction log size, and regular incremental backups to ensure the logs are truncated regularly.

Why are my SharePoint Audit Logs missing the MachineName and MachineIP data?

Audit Log Reporting seems to be one of those topics within SharePoint that is still a little misunderstood.  I have blogged on it before here, and suggest that if you are not familiar with Audit Logs that you view that post quickly before reading on.  There is also an overview which can be read here on the office.microsoft.com site.

I received a question about Audit Log Reporting from one of the readers of my blog a few months ago, and since then it hasn't been the first time I've heard it :

I read your blog about SharePoint Audit Log Report. I'm trying to get a report but I cannot get the "Machine Name" and "Machine IP" data. Can you help me? Is there any settings that I'm missing?

My answer was that there were no settings missing, and unfortunately the data missing is by design. 

Here is a row taken straight from the Audit table :

Site Id Item Id Item Type User Id Machine Name Machine IP Document Location Location Type Occurred (GMT) Event Custom Event Name Event Source Source Name Event Data
ed91340f-e335-45d2-82f3-c6521eb23fc0 59af845e-b604-436e-9c08-0a948a27d996 Document NT AUTHORITYlocal service _catalogs/masterpage/Editing Menu/CustomSiteAction.xml

As you can see the MachineName and MachineIP values are mysteriously null, in fact querying the table for a row where they were not null returns zero results, they are never used. Unfortunately the reason in this case is to view KB939246, which has the following as a cause : The values in the MachineIP column and in the MachineName column appear as NULL because of privacy concerns. By design, Windows SharePoint Services 3.0 works in this manner.

This feature is not going to be reporting MachineName or MachineIP of actions in the audit log any time soon, it is a bit of a shame because I can imagine some occasions where this could be useful.  Keep in mind that your IIS logs will still contain all the IP information, and if you have a timestamp you should have no problem tracing that request back to a particular IP.  Unless you have your site set to be edited by anonymous users, the UserID field is going to be far more valuable when utilizing these reports, however you may need to perform a join to the userinfo before you will get anything particularly relevant out of it, i.e.

SELECT     UserInfo.tp_Login AS UserLogin, UserInfo.tp_Title AS UserTitle, AuditData.SiteId, AuditData.ItemId, AuditData.ItemType, AuditData.DocLocation,
                      AuditData.Occurred, AuditData.Event, AuditData.EventName, AuditData.EventSource, AuditData.SourceName, AuditData.EventData
FROM         AuditData
INNER JOIN UserInfo ON AuditData.UserId = UserInfo.tp_ID

I would not be surprised if the functionality to turn back on the MachineIP and MachineName reporting could be enabled by flicking a switch in the registry or database, but as yet I have had no luck finding it.  Maybe someone else out there will, good luck!

December Cumulative Updates for SharePoint re-released.

If you have tried to install the recently released December Cumulative Update for SharePoint you may have noticed that the original release actually fails during the post-installation configuration.  Jeremy Thake came across the same issue at and has more detail on it here http://wss.made4the.net/archive/2008/12/20/sharepoint-december-cumulative-update-error-and-resolution.aspx . I had difficulty installing this myself, but was able to get around the errors that occur by taking similar steps to Jeremy.  

 Fortunately the SharePoint Team noticed this fairly quickly and have released an updated version of December Cumulative Updates that no longer causes this issue.The revised version can be downloaded from the updated links on the original SharePoint team blog post : http://blogs.msdn.com/sharepoint/archive/2008/12/17/announcing-december-cumulative-update-for-office-sharepoint-server-2007-and-windows-sharepoint-services-3-0.aspx, and now there is a small comment on the page reflecting the investigation and update to the installer. 

A comment from myself on this particular update, finally it is actually cumulative!  This update can be applied from SharePoint SP1 upwards, however, as always, just because hotfixes are released does not mean they need to be installed!  Gauge the need to install them carefully against the problems they resolve.  For most installations SP1 + Infrastructure Updates will be more than sufficient, with the exception of any security updates that have or may be released in the future, i.e.  MS08-077.

Revisited – Content Deployment error? How to find those checked out items within Sharepoint

A month or so ago I put up a post about how to find checked out items within a Sharepoint site.  This particular error tends to bring up problems with Content Deployment, as CD cannot occur if there are any items checked out.

Unfortunately there is no inbuilt method to find these items for an Administrator, the only way within the standard Sharepoint interface if that on the Site Actions menu, each user can check if there are any items still checked out and quickly check them back in.  Training users to do this can be problematic however, and sometimes it is just easier to point them at the items that are still checked out.

I had a query to do this, but one of the readers has suggested a much better query than my own for finding these items :

SELECT AllUserData.tp_DirName, 'http://SiteName/&#039; + AllUserData.tp_DirName, AllUserData.tp_LeafName,
case when AllUserData.tp_ContentType = 'Item'
then 'http://SiteName/&#039; + AllUserData.tp_DirName + '/DispForm.aspx?ID=' + AllUserData.tp_LeafName
else 'http://SiteName/&#039; + AllUserData.tp_DirName + '/' + AllUserData.tp_LeafName
end as Link,AllUserData.tp_ContentType, AllUserData.nvarchar1, AllUserData.nvarchar2, AllUserData.tp_ModerationStatus, AllUserData.tp_DeleteTransactionId, AllUserData.tp_IsCurrent
FROM AllUserData AllUserData
WHERE (AllUserData.tp_ModerationStatus=2)
AND (AllUserData.tp_DeleteTransactionId=0x0)
AND (AllUserData.tp_IsCurrent=1)
ORDER BY AllUserData.tp_DirName, AllUserData.tp_LeafName

Just replace the http://SiteName/ with the url to your Site, and use this on the database of your Web Application and you are good to go. Thank you very much to rwoods@city.pg.bc.ca for supplying this great query.